GraphQL به هیچ نوع پایگاه داده یا موتور ذخیره سازی وابسته نیست و بجای آن از همان کدهایی که نوشته اید استفاده می کند.
GraphQL ابزاری است که باعث افزایش انعطاف پذیری فراخوانی API ها می شود و ما می توانیم از یک زبان کوئری همانند زبان کوئری که در هنگام کار با دیتابیس استفاده می کنیم، برای دسترسی به APIها استفاده کنیم. این یک قابلیت خیلی قدرتمند برای ساخت API های پیچیده است.
GraphQL یک رابط کاربری برای کمک به نوشتن کوئری ارائه کرده که از قابلیت تکمیل خودکار کدها برخوردار است و در هنگام نوشتن کوئری ها کمک زیادی به ما می کند.

مطالعه موردی: یک مثال درباره API لیست محصولات و لیست کاربران
شروع کار
1- نصب لاراول
ابتدا با دستور زیر آخرین نسخه لاراول را نصب کنید.
# run in terminal
composer global require "laravel/installer"
laravel new laravel-graphql
2- افزودن پکیج GraphQL
پکیج graphql-laravel را توسط کامپوزر نصب کنید، این پکیج قابلیت های زیادی برای یکپارچه کردن لاراول با GraphQL دارد.
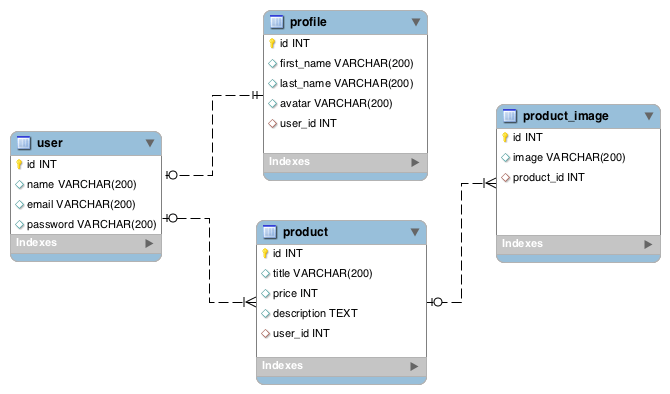
3- ایجاد مدل
جدول مدل های product ،user_profile ،product_image را همانند زیر ایجاد کنید و روابط بین آنها را هم مانند تصویر زیر تعریف کنید.
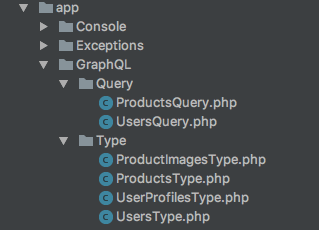
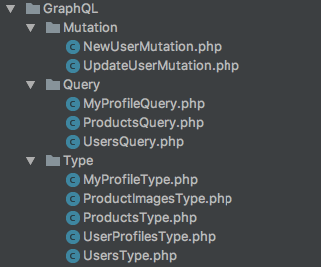
4- ایجاد query و Type در GraphQL
Query در GraphQL همانند تعریف مسیر endpoint در Restful Api ها است.
Query تنها برای دریافت داده ها استفاده می شود و برای انجام عملیات های create، update و delete از Mutationها استفاده می کنیم.
Typeها برای تعریف نوع فیلدهای query استفاده می شود. Typeها به ما کمک می کنند تا نوع فیلدهای نتایجی که از اجرای یک کوئری بدست می آید را فرمت بندی کنیم. برای مثال نوع های بولین، رشته ای، اعشاری و اعداد صحیح و … . همچنین می توانیم نوع های سفارشی تعریف کنیم.
تصویر زیر ساختار دایرکتوری مربوط به query و Typeها را نمایش می دهد.
در زیر کد کامل userQuery.php و usersType.php را آورده ایم.
<?php
namespace App\GraphQL\Query;
use App\User;
use GraphQL\Type\Definition\Type;
use Rebing\GraphQL\Support\Facades\GraphQL;
use Rebing\GraphQL\Support\Query;
use Rebing\GraphQL\Support\SelectFields;
class UsersQuery extends Query
{
    protected $attributes = [
        'name' => 'Users Query',
        'description' => 'A query of users'
    ];
    public function type()
    {
        // result of query with pagination laravel
        return GraphQL::paginate('users');
    }

    // arguments to filter query
    public function args()
    {
        return [
            'id' => [
                'name' => 'id',
                'type' => Type::int()
            ],
            'email' => [
                'name' => 'email',
                'type' => Type::string()
            ]
        ];
    }
    public function resolve($root, $args, SelectFields $fields)
    {
        $where = function ($query) use ($args) {
            if (isset($args['id'])) {
                $query->where('id',$args['id']);
            }
            if (isset($args['email'])) {
                $query->where('email',$args['email']);
            }
        };
        $user = User::with(array_keys($fields->getRelations()))
            ->where($where)
            ->select($fields->getSelect())
            ->paginate();
        return $user;
    }
}
<?php
namespace App\GraphQL\Type;
use App\User;
use GraphQL\Type\Definition\Type;
use Rebing\GraphQL\Support\Facades\GraphQL;
use Rebing\GraphQL\Support\Type as GraphQLType;
class UsersType extends GraphQLType
{
    protected $attributes = [
        'name' => 'Users',
        'description' => 'A type',
        'model' => User::class, // define model for users type
    ];

    // define field of type
    public function fields()
    {
        return [
            'id' => [
                'type' => Type::nonNull(Type::int()),
                'description' => 'The id of the user'
            ],
            'email' => [
                'type' => Type::string(),
                'description' => 'The email of user'
            ],
            'name' => [
                'type' => Type::string(),
                'description' => 'The name of the user'
            ],
            // field relation to model user_profiles
            'user_profiles' => [
                'type' => GraphQL::type('user_profiles'),
                'description' => 'The profile of the user'
            ]
        ];
    }
    protected function resolveEmailField($root, $args)
    {
        return strtolower($root->email);
    }
}
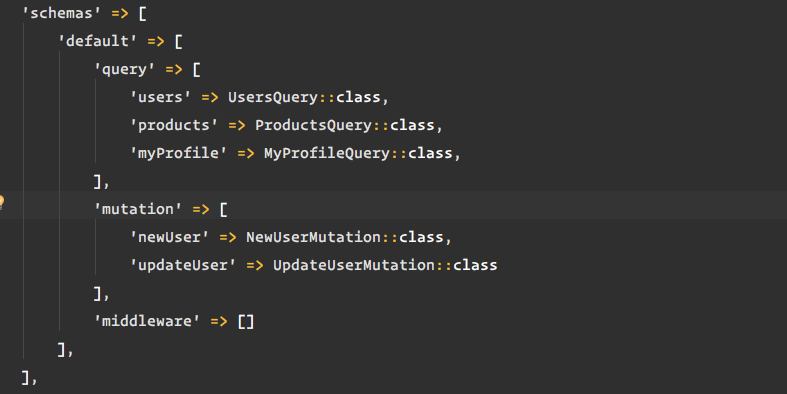
بعد از ایجاد query و Typeها، باید آنها را در فایل config/graphql.php ثبت کنیم.
<?php
use App\GraphQL\Query\ProductsQuery;
use App\GraphQL\Query\UsersQuery;
use App\GraphQL\Type\ProductImagesType;
use App\GraphQL\Type\ProductsType;
use App\GraphQL\Type\UserProfilesType;
use App\GraphQL\Type\UsersType;
return [
    'prefix' => 'graphql',
    'routes' => 'query/{graphql_schema?}',
    'controllers' => \Rebing\GraphQL\GraphQLController::class . '@query',
    'middleware' => [],
    'default_schema' => 'default',
    // register query
    'schemas' => [
        'default' => [
            'query' => [
                'users' => UsersQuery::class,
                'products' => ProductsQuery::class,
            ],
            'mutation' => [
            ],
            'middleware' => []
        ],
    ],
    // register types
    'types' => [
        'product_images' => ProductImagesType::class,
        'products'  => ProductsType::class,
        'user_profiles'  => UserProfilesType::class,
        'users'  => UsersType::class,
    ],
    'error_formatter' => ['\Rebing\GraphQL\GraphQL', 'formatError'],
    'params_key'    => 'params'
];
5- تست برنامه
ما می توانیم به راحتی از GraphQL برای دریافت نتایج از APIها استفاده کنیم.
چون هنگامی که شروع به کدنویسی کنیم قابلیت تکمیل خودکار کد در GraphQL به ما در کدنویسی کمک زیادی می کند و همچنین توسط برنامه postman می توانیم به راحتی APIها را فراخوانی کنیم. در زیر مثالی از تکمیل خودکار کد را می بینید.
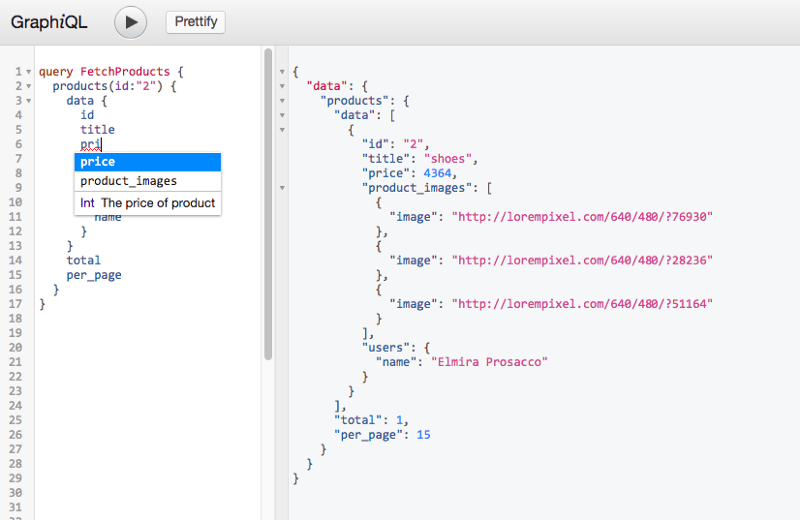
و نتیجه کدهای بالا را در تصویر زیر می بینید:

در این قسمت درباره Mutation و اعتبارسنجی Api توسط GraphQL توضیح خواهم داد.
GraphQL یک ابزار عالی برای ساخت راحت و دینامیک Api ها است و می توانید از این ابزار در برنامه های سمت کلاینتی که با ReactJs/ReactNative نوشته اید، استفاده کنید. همچنین کتابخانه های زیادی برای پشتیبانی از GraphQL ساخته شده اند.
ایجاد کلاس های Mutation
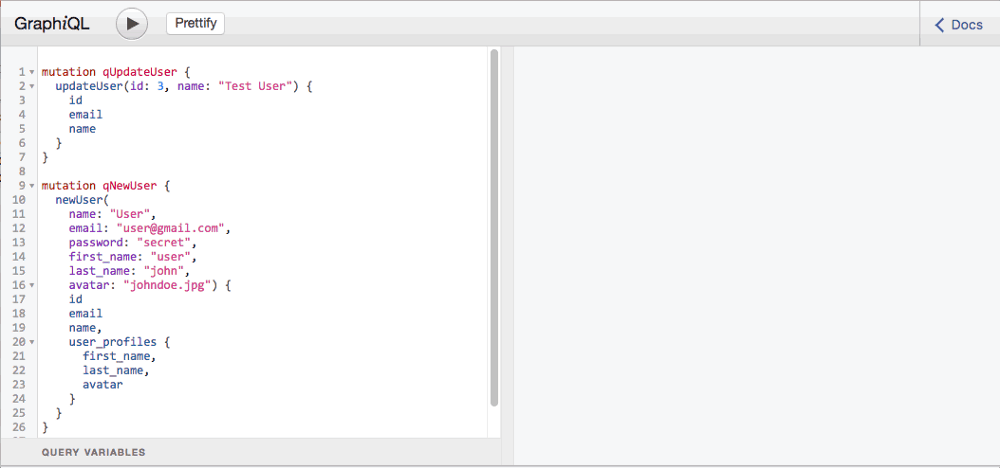
۱ – افزودن Mutaion
در بخش قبلی دیدید که یک مدل به نام user داشتیم، حال می توانیم به راحتی دو کلاس Mutation، یکی برای افزودن کاربر جدید یعنی کلاس NewUserMutation.php و دیگری برای بروزرسانی کلاس user یعنی updateUserMutation.php ایجاد کنیم.
در فایل NewUserMutation.php تابعی به نام args داریم که در آن نام فیلد ورودی و نوع فیلدهای ورودی مان را تعریف می کنیم: Type::nonNull یعنی پر کردن این فیلد اجباری است.
<?php
/**
 * Created by PhpStorm.
 * User: ardani
 * Date: 8/4/17
 * Time: 10:02 AM
 */
namespace App\GraphQL\Mutation;
use GraphQL\Type\Definition\Type;
use Rebing\GraphQL\Support\Facades\GraphQL;
use Rebing\GraphQL\Support\Mutation;
use App\User;
class NewUserMutation extends Mutation
{
    protected $attributes = [
        'name' => 'NewUser'
    ];
    public function type()
    {
        return GraphQL::type('users');
    }
    public function args()
    {
        return [
            'name' => [
                'name' => 'name',
                'type' => Type::nonNull(Type::string())
            ],
            'email' => [
                'name' => 'email',
                'type' => Type::nonNull(Type::string())
            ],
            'password' => [
                'name' => 'password',
                'type' => Type::nonNull(Type::string())
            ],
            'first_name' => [
                'name' => 'first_name',
                'type' => Type::nonNull(Type::string())
            ],
            'last_name' => [
                'name' => 'last_name',
                'type' => Type::string()
            ],
            'avatar' => [
                'name' => 'avatar',
                'type' => Type::string()
            ]
        ];
    }
    public function resolve($root, $args)
    {
        $args['password'] = bcrypt($args['password']);
        $user = User::create($args);
        if (!$user) {
            return null;
        }
        $user->user_profiles()->create($args);
        return $user;
    }
}
updateUserMutation.php برای بروزرسانی داده های کاربر استفاده می شود. تمام عملیات های درج و بروزرسانی هنوز هم توسط Eloquent انجام می شود و برای کوئری های پیچیده می توانید از Query Builder استفاده کنید.
<?php
/**
 * Created by PhpStorm.
 * User: ardani
 * Date: 8/4/17
 * Time: 10:02 AM
 */
namespace App\GraphQL\Mutation;
use GraphQL\Type\Definition\Type;
use Rebing\GraphQL\Support\Facades\GraphQL;
use Rebing\GraphQL\Support\Mutation;
use App\User;
class UpdateUserMutation extends Mutation
{
    protected $attributes = [
        'name' => 'UpdateUser'
    ];
    public function type()
    {
        return GraphQL::type('users');
    }
    public function args()
    {
        return [
            'id' => [
                'name' => 'id',
                'type' => Type::nonNull(Type::int())
            ],
            'name' => [
                'name' => 'name',
                'type' => Type::nonNull(Type::string())
            ]
        ];
    }
    public function resolve($root, $args)
    {
        $user = User::find($args['id']);
        if (!$user) {
            return null;
        }
        $user->name = $args['name'];
        $user->save();
        return $user;
    }
}
2- اضافه کردن Mutationها در GraphQL
کلاس graphql.php که در فولدر config قرار گرفته را باز کنید و در قسمت Mutation، کلاس های Mutationیی که در مرحله قبل ساختید را به آن اضافه کنید.

بعد از اضافه کردن کلاس Mutation آدرس http://127.0.0.1:8000/graphql-ui را در مرورگر باز کنید. با انجام این کار جزئیات Mutationها نمایش داده می شود.
۳- دمو
احراز هویت JWT در GraphQL
این اطلاعات می تواند به راحتی اعتبارسنجی شود، چون بصورت دیجیتالی امضا می شوند.
JWT ها توسط یک کلید محرمانه ( با الگوریتم HMAC) یا یک کلید خصوصی/ عمومی که با الگوریتم RSA رمزنگاری شده، امضا می شود.
1- نصب پکیج JWT
JWT ابزار مفیدی برای احراز هویت بدون حالت APIها است و توسط پکیج زیر به راحتی با لاراول یکپارچه می شود.
این پکیج را می توانید از این لینک دریافت کنید
برای آموزش نصب این پکیج این لینک را دنبال کنید.
2- ایجاد کنترلر و احراز هویت
ما از پارامتر Authorization:Bearer yourtokenhere در هدر تمام درخواست هایی که به GraphQL ارسال می شود استفاده می کنیم که در این پارامتر عبارت yourtokenhere با توکن (Token) کاربر که توسط پکیج jwt احراز هویت شده است، ایجاد می گردد.
ابتدا یک کنترلر برای احراز هویت ایجاد می کنیم.
<?php
/**
 * Created by PhpStorm.
 * User: ardani
 * Date: 8/4/17
 * Time: 11:18 AM
 */
namespace App\Http\Controllers;
use Illuminate\Http\Request;
use Tymon\JWTAuth\Exceptions\JWTException;
use Tymon\JWTAuth\JWTAuth;
class AuthenticateController extends Controller
{
    private $jwt;
    public function __construct(JWTAuth $jwt)
    {
        $this->jwt = $jwt;
    }
    public function authenticate(Request $request)
    {
        // grab credentials from the request
        $credentials = $request->only('email', 'password');
        try {
            // attempt to verify the credentials and create a token for the user
            if (! $token = $this->jwt->attempt($credentials)) {
                return response()->json(['error' => 'invalid_credentials'], 401);
            }
        } catch (JWTException $e) {
            // something went wrong whilst attempting to encode the token
            return response()->json(['error' => 'could_not_create_token'], 500);
        }
        // all good so return the token
        return response()->json(compact('token'));
    }
}
سپس کد زیر که برای login استفاده می شود را به فایل web.php اضافه کنید.
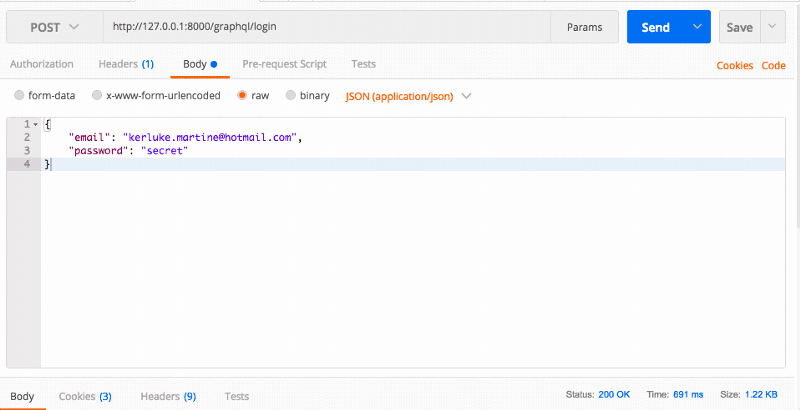
Route::post(‘graphql/login’, ‘AuthenticateController@authenticate’);
3- ایجاد Query به همراه اعتبارسنجی
برای مثال ما از کوئری myProfile برای دسترسی به myProfile ایی که توسط JWT احراز هویت شود، استفاده می کنیم. ابتدا یک فایل به نام myProfileQuery.php ایجاد می کنیم.
<?php
namespace App\GraphQL\Query;
use App\User;
use Rebing\GraphQL\Support\Facades\GraphQL;
use Rebing\GraphQL\Support\Query;
use Rebing\GraphQL\Support\SelectFields;
use Tymon\JWTAuth\Facades\JWTAuth;
class MyProfileQuery extends Query
{
    private $auth;
    protected $attributes = [
        'name' => 'My Profile Query',
        'description' => 'My Profile Information'
    ];
    public function authorize(array $args)
    {
        try {
            $this->auth = JWTAuth::parseToken()->authenticate();
        } catch (\Exception $e) {
            $this->auth = null;
        }
        return (boolean) $this->auth;
    }
    public function type()
    {
        return GraphQL::type('myprofile');
    }
    public function resolve($root, $args, SelectFields $fields)
    {
        $user = User::with(array_keys($fields->getRelations()))
            ->where('id', $this->auth->id)
            ->select($fields->getSelect())->first();
        return $user;
    }
}
عمل احراز هویت در متد authorize انجام می گیرد و ابتدا باید احراز هویت JWT را بررسی کنیم. در صورتی که هویت معتبر بود، ادامه فرآیند را انجام می دهیم، اما در صورتی که عمل احراز هویت ناموفق بود، پیام unauthorized را به عنوان نتیجه GraphQL بر می گردانیم.
یادتان باشد که حتماً این فایل کوئری را به config > graphql.php اضافه کنید.
4- دمو
سورس کامل برنامه را از اینجا دریافت کنید.