آموزش عملیات CRUD در لاراول 5.7
در این آموزش قصد داریم عملیات CRUD را در لاراول 5.7 خدمت شما کاربران گرامی ارائه بدهیم. در نسخه 5.7 لاراول چند ویژگی جدید به آن اضافه و باگ های موجود در آن رفع شده است. در رویداد Laracon قبلی، Taylor Otwell تغییراتی که در این نسخه انجام شده را معرفی کرد و در زیر تعدادی از آنها را آورده ایم:
- تغییر دایرکتوری های منابع
- Action Url های قابل فراخوانی
- Laravel Dump Server
- بهبود پیام خطاهای فراخوانی دینامیک
در این آموزش ابتدا لاراول 5.7 را نصب و سپس یک برنامه برای عملیات CRUD ایجاد می کنیم.
سرفصل های این آموزش
- نصب لاراول 5.7
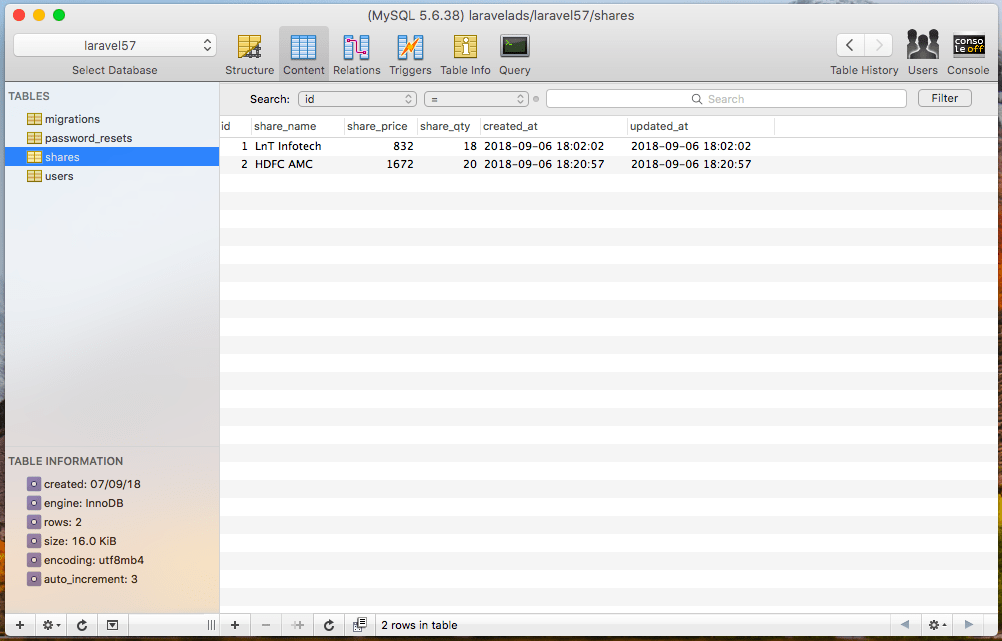
- پیکربندی پایگاه داده MySQL
- ایجاد یک مدل و فایل Migration
- ایجاد Route و کنترلر ها
- ایجاد ویوها
- ذخیره داده ها
- نمایش داده ها
- ویرایش و بروزرسانی داده ها
- حذف داده ها
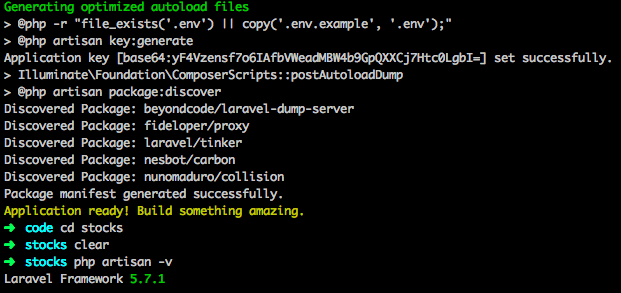
1- نصب لاراول 5.7
دستورات زیر را در محیط ترمینال (در ویندوز CMD) وارد کنید. مطمئن شوید که قبلاً composer را نصب کرده اید.
composer create-project --prefer-dist laravel/laravel stocks
حال داخل فولدر رفته و پکیج های npm را با دستور زیر نصب کنید. مطمئن شوید که قبلا node.js را در سیستم تان نصب کرده اید. در صورتی که آن را نصب نکرده اید، می توانید آن را از سایت رسمی Node.js، آن را دانلود و نصب کنید.
npm install
2- پیکربندی پایگاه داده MySQL
حال باید یک پایگاه داده در MySQl ایجاد کنیم و این پایگاه داده را به برنامه لاراولی مان متصل کنیم. همچنین میتوانید از phpMyAdmin برای ایجاد پایگاه داده استفاده کنید.
بعد از ایجاد پایگاه داده، فایل .env در روت پروژه را باز کرده و مشخصات پایگاه داده ایجاد شده را به آن اضافه کنید.
DB_CONNECTION=mysql
DB_HOST=127.0.0.1
DB_PORT=3306
DB_DATABASE=laravel57
DB_USERNAME=root
DB_PASSWORD=root
حال می توانید به پایگاه داده MySQL وصل شوید. لاراول همیشه از فایل های migration برای کار با پایگاه داده استفاده می کند. شما می توانید جدول های پایگاه داده تان را با دستور زیر ایجاد کنید.
php artisan migrate

3- ایجاد یک مدل و فایل migration
به محیط ترمینال رفته و دستورات زیر را برای ایجاد مدل و همچنین فایل Migration مربوط به آن ایجاد کنید.
php artisan make:model Share -m
این دستور فایل مدل و migration را ایجاد می کند. حال کدهای زیر را در فایل <timestamp>create_shares_table.php بنویسید.
/**
     * Run the migrations.
     *
     * @return void
     */
    public function up()
    {
        Schema::create('shares', function (Blueprint $table) {
            $table->increments('id');
            $table->string('share_name');
            $table->integer('share_price');
            $table->integer('share_qty');
            $table->timestamps();
        });
    }
حال جدول ها را با دستور زیر ایجاد می کنیم.
php artisan migrate
حال یک پروپرتی به نام fillableداخل فایل share.php ایجاد می کنیم.
<?php

namespace App;

use Illuminate\Database\Eloquent\Model;

class Share extends Model
{
  protected $fillable = [
    'share_name',
    'share_price',
    'share_qty'
  ];
}
4- ایجاد روت و کنترلر
ابتدا کنترلر shareController را با دستور زیر ایجاد می کنیم.
php artisan make:controller ShareController --resource
حال داخل فایل routes > web.php کدهای زیر را قرار دهید.
<?php
Route::get('/', function () {
return view('welcome');
});
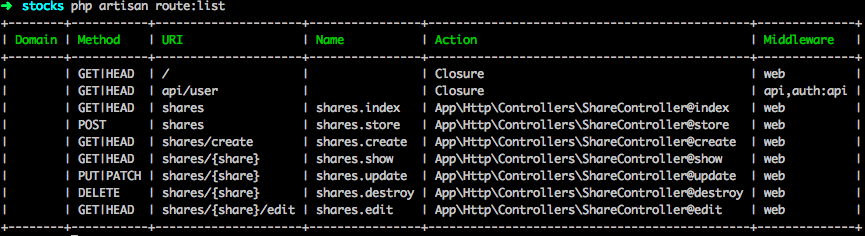
Route::resource('shares', 'ShareController');
با کدهای بالا چندین روت را برای برنامه تان ثبت کردیم. و برای تست آن، دستور زیر را اجرا کنید.
php artisan route:list
حال فایل shareController.php را باز کنید. در این فایل تمام توابعی که در آن تعریف شده اند را می بینید.
<?php

namespace App\Http\Controllers;

use Illuminate\Http\Request;

class ShareController extends Controller
{
    /**
     * Display a listing of the resource.
     *
     * @return \Illuminate\Http\Response
     */
    public function index()
    {
        //
    }

    /**
     * Show the form for creating a new resource.
     *
     * @return \Illuminate\Http\Response
     */
    public function create()
    {
        //
    }

    /**
     * Store a newly created resource in storage.
     *
     * @param  \Illuminate\Http\Request  $request
     * @return \Illuminate\Http\Response
     */
    public function store(Request $request)
    {
        //
    }

    /**
     * Display the specified resource.
     *
     * @param  int  $id
     * @return \Illuminate\Http\Response
     */
    public function show($id)
    {
        //
    }

    /**
     * Show the form for editing the specified resource.
     *
     * @param  int  $id
     * @return \Illuminate\Http\Response
     */
    public function edit($id)
    {
        //
    }

    /**
     * Update the specified resource in storage.
     *
     * @param  \Illuminate\Http\Request  $request
     * @param  int  $id
     * @return \Illuminate\Http\Response
     */
    public function update(Request $request, $id)
    {
        //
    }

    /**
     * Remove the specified resource from storage.
     *
     * @param  int  $id
     * @return \Illuminate\Http\Response
     */
    public function destroy($id)
    {
        //
    }
}
5- ایجاد ویوها
داخل فولدر resource > views یک فولدر به نام shares ایجاد کنید.
داخل این فولدر، فایل های زیر را ایجاد کنید.
- create.blade.php
- edit.blade.php
- index.blade.php
همچنین باید یک فایل layout در فولدر views ایجاد کنیم. برای این منظور یک فایل به نام layout.blade.php در فولدر views ایجاد و کدهای زیر را در آن قرار دهید:
<!DOCTYPE html>
<html lang="en">
<head>
  <meta charset="UTF-8">
  <meta name="viewport" content="width=device-width, initial-scale=1.0">
  <meta http-equiv="X-UA-Compatible" content="ie=edge">
  <title>Laravel 5.7 CRUD Example Tutorial</title>
  <link href="{{ asset('css/app.css') }}" rel="stylesheet" type="text/css" />
</head>
<body>
  <div class="container">
    @yield('content')
  </div>
  <script src="{{ asset('js/app.js') }}" type="text/js"></script>
</body>
</html>
این فایل قالب اصلی برنامه مان است و بقیه viewها از این قالب استفاده می کند.با افزودن فایل app.css به این قالب می توانید از بوت استرپ 4 استفاده کنید.فایل create.blade.php را باز کرده و کدهای زیر را در آن قرار دهید:
@extends('layout')

@section('content')
<style>
  .uper {
    margin-top: 40px;
  }
</style>
<div class="card uper">
  <div class="card-header">
    Add Share
  </div>
  <div class="card-body">
    @if ($errors->any())
      <div class="alert alert-danger">
        <ul>
            @foreach ($errors->all() as $error)
              <li>{{ $error }}</li>
            @endforeach
        </ul>
      </div><br />
    @endif
      <form method="post" action="{{ route('shares.store') }}">
          <div class="form-group">
              @csrf
              <label for="name">Share Name:</label>
              <input type="text" class="form-control" name="share_name"/>
          </div>
          <div class="form-group">
              <label for="price">Share Price :</label>
              <input type="text" class="form-control" name="share_price"/>
          </div>
          <div class="form-group">
              <label for="quantity">Share Quantity:</label>
              <input type="text" class="form-control" name="share_qty"/>
          </div>
          <button type="submit" class="btn btn-primary">Add</button>
      </form>
  </div>
</div>
@endsection
سپس فایل shareController.php را باز کنید و یک متد create ایجاد کنید و داخل این متد باید ویوی create.blade.php را برگردانیم.
// ShareController.php

public function create()
{
   return view('shares.create');
}
فایل را ذخیره کنید و دستور زیر را برای اجرا برنامه، وارد ترمینال کنید.
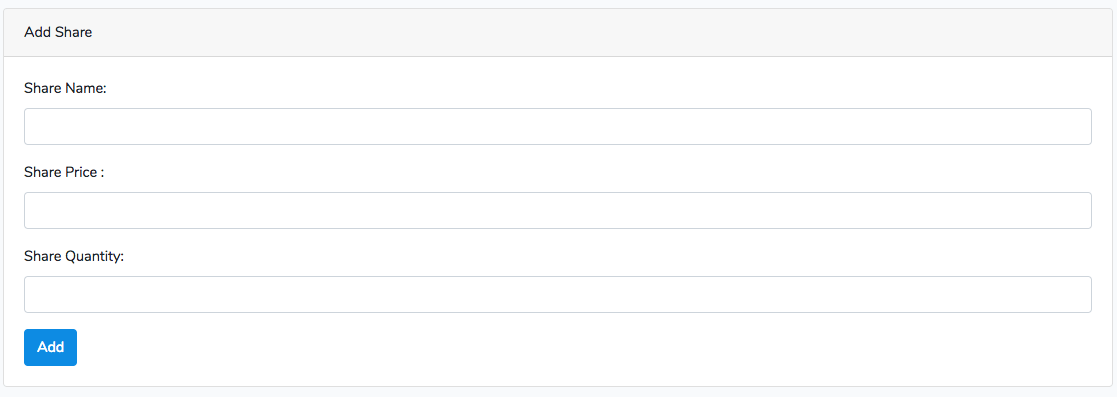
php artisan serve
به آدرس http://localhost:8000/shares/create بروید. در تصویر زیر خروجی برنامه را می بینید.
6- ذخیره داده ها
حال باید کدهای متد store را برای ذخیره داده ها در پایگاه داده ها بنویسیم. برای اینکار ابتدا مدل share.php را به shareController.php اضافه کنید (دستور use share.php را بالای فایل بنویسید)
<?php

namespace App\Http\Controllers;

use Illuminate\Http\Request;
use App\Share;

class ShareController extends Controller
{
    /**
     * Display a listing of the resource.
     *
     * @return \Illuminate\Http\Response
     */
    public function index()
    {
        //
    }

    /**
     * Show the form for creating a new resource.
     *
     * @return \Illuminate\Http\Response
     */
    public function create()
    {
        return view('shares.create');
    }

    /**
     * Store a newly created resource in storage.
     *
     * @param  \Illuminate\Http\Request  $request
     * @return \Illuminate\Http\Response
     */
    public function store(Request $request)
    {
      $request->validate([
        'share_name'=>'required',
        'share_price'=> 'required|integer',
        'share_qty' => 'required|integer'
      ]);
      $share = new Share([
        'share_name' => $request->get('share_name'),
        'share_price'=> $request->get('share_price'),
        'share_qty'=> $request->get('share_qty')
      ]);
      $share->save();
      return redirect('/shares')->with('success', 'Stock has been added');
    }

    /**
     * Display the specified resource.
     *
     * @param  int  $id
     * @return \Illuminate\Http\Response
     */
    public function show($id)
    {
        //
    }

    /**
     * Show the form for editing the specified resource.
     *
     * @param  int  $id
     * @return \Illuminate\Http\Response
     */
    public function edit($id)
    {
        //
    }

    /**
     * Update the specified resource in storage.
     *
     * @param  \Illuminate\Http\Request  $request
     * @param  int  $id
     * @return \Illuminate\Http\Response
     */
    public function update(Request $request, $id)
    {
        //
    }

    /**
     * Remove the specified resource from storage.
     *
     * @param  int  $id
     * @return \Illuminate\Http\Response
     */
    public function destroy($id)
    {
        //
    }
}
اگر اعتبارسنجی ناموفق باشد، یک خطا اتفاق می افتد و ما آنرا در فایل create.blade.php نمایش می دهیم. اگر تمام داده ها معتبر بود و اعتبارسنجی موفقیت آمیز باشد، مقادیر در پایگاه داده ذخیره می شوند.
7- نمایش داده ها
حال فایل index.blade.php را باز کرده و کدهای زیر را در آن وارد کنید.
@extends('layout')

@section('content')
<style>
  .uper {
    margin-top: 40px;
  }
</style>
<div class="uper">
  @if(session()->get('success'))
    <div class="alert alert-success">
      {{ session()->get('success') }}
    </div><br />
  @endif
  <table class="table table-striped">
    <thead>
        <tr>
          <td>ID</td>
          <td>Stock Name</td>
          <td>Stock Price</td>
          <td>Stock Quantity</td>
          <td colspan="2">Action</td>
        </tr>
    </thead>
    <tbody>
        @foreach($shares as $share)
        <tr>
            <td>{{$share->id}}</td>
            <td>{{$share->share_name}}</td>
            <td>{{$share->share_price}}</td>
            <td>{{$share->share_qty}}</td>
            <td><a href="{{ route('shares.edit',$share->id)}}" class="btn btn-primary">Edit</a></td>
            <td>
                <form action="{{ route('shares.destroy', $share->id)}}" method="post">
                  @csrf
                  @method('DELETE')
                  <button class="btn btn-danger" type="submit">Delete</button>
                </form>
            </td>
        </tr>
        @endforeach
    </tbody>
  </table>
<div>
@endsection
اینجا کدهای متد index() را در فایل shareController.php می نویسیم.
<?php

namespace App\Http\Controllers;

use Illuminate\Http\Request;
use App\Share;

class ShareController extends Controller
{
    /**
     * Display a listing of the resource.
     *
     * @return \Illuminate\Http\Response
     */
    public function index()
    {
        $shares = Share::all();

        return view('shares.index', compact('shares'));
    }

    /**
     * Show the form for creating a new resource.
     *
     * @return \Illuminate\Http\Response
     */
    public function create()
    {
        return view('shares.create');
    }

    /**
     * Store a newly created resource in storage.
     *
     * @param  \Illuminate\Http\Request  $request
     * @return \Illuminate\Http\Response
     */
    public function store(Request $request)
    {
      $request->validate([
        'share_name'=>'required',
        'share_price'=> 'required|integer',
        'share_qty' => 'required|integer'
      ]);
      $share = new Share([
        'share_name' => $request->get('share_name'),
        'share_price'=> $request->get('share_price'),
        'share_qty'=> $request->get('share_qty')
      ]);
      $share->save();
      return redirect('/shares')->with('success', 'Stock has been added');
    }

    /**
     * Display the specified resource.
     *
     * @param  int  $id
     * @return \Illuminate\Http\Response
     */
    public function show($id)
    {
        //
    }

    /**
     * Show the form for editing the specified resource.
     *
     * @param  int  $id
     * @return \Illuminate\Http\Response
     */
    public function edit($id)
    {
        //
    }

    /**
     * Update the specified resource in storage.
     *
     * @param  \Illuminate\Http\Request  $request
     * @param  int  $id
     * @return \Illuminate\Http\Response
     */
    public function update(Request $request, $id)
    {
        //
    }

    /**
     * Remove the specified resource from storage.
     *
     * @param  int  $id
     * @return \Illuminate\Http\Response
     */
    public function destroy($id)
    {
        //
    }
}
8- ویرایش و آپلود داده ها
ابتدا کدهای متد edit() را در فایل shareController.php می نویسیم.
<?php

namespace App\Http\Controllers;

use Illuminate\Http\Request;
use App\Share;

class ShareController extends Controller
{
    /**
     * Display a listing of the resource.
     *
     * @return \Illuminate\Http\Response
     */
    public function index()
    {
        $shares = Share::all();

        return view('shares.index', compact('shares'));
    }

    /**
     * Show the form for creating a new resource.
     *
     * @return \Illuminate\Http\Response
     */
    public function create()
    {
        return view('shares.create');
    }

    /**
     * Store a newly created resource in storage.
     *
     * @param  \Illuminate\Http\Request  $request
     * @return \Illuminate\Http\Response
     */
    public function store(Request $request)
    {
      $request->validate([
        'share_name'=>'required',
        'share_price'=> 'required|integer',
        'share_qty' => 'required|integer'
      ]);
      $share = new Share([
        'share_name' => $request->get('share_name'),
        'share_price'=> $request->get('share_price'),
        'share_qty'=> $request->get('share_qty')
      ]);
      $share->save();
      return redirect('/shares')->with('success', 'Stock has been added');
    }

    /**
     * Display the specified resource.
     *
     * @param  int  $id
     * @return \Illuminate\Http\Response
     */
    public function show($id)
    {
        //
    }

    /**
     * Show the form for editing the specified resource.
     *
     * @param  int  $id
     * @return \Illuminate\Http\Response
     */
    public function edit($id)
    {
        $share = Share::find($id);

        return view('shares.edit', compact('share'));
    }

    /**
     * Update the specified resource in storage.
     *
     * @param  \Illuminate\Http\Request  $request
     * @param  int  $id
     * @return \Illuminate\Http\Response
     */
    public function update(Request $request, $id)
    {
        //
    }

    /**
     * Remove the specified resource from storage.
     *
     * @param  int  $id
     * @return \Illuminate\Http\Response
     */
    public function destroy($id)
    {
        //
    }
}
سپس کدهای زیر را در فایل edit.blade.php بنویسید
@extends('layout')

@section('content')
<style>
  .uper {
    margin-top: 40px;
  }
</style>
<div class="card uper">
  <div class="card-header">
    Edit Share
  </div>
  <div class="card-body">
    @if ($errors->any())
      <div class="alert alert-danger">
        <ul>
            @foreach ($errors->all() as $error)
              <li>{{ $error }}</li>
            @endforeach
        </ul>
      </div><br />
    @endif
      <form method="post" action="{{ route('shares.update', $share->id) }}">
        @method('PATCH')
        @csrf
        <div class="form-group">
          <label for="name">Share Name:</label>
          <input type="text" class="form-control" name="share_name" value={{ $share->share_name }} />
        </div>
        <div class="form-group">
          <label for="price">Share Price :</label>
          <input type="text" class="form-control" name="share_price" value={{ $share->share_price }} />
        </div>
        <div class="form-group">
          <label for="quantity">Share Quantity:</label>
          <input type="text" class="form-control" name="share_qty" value={{ $share->share_qty }} />
        </div>
        <button type="submit" class="btn btn-primary">Update</button>
      </form>
  </div>
</div>
@endsection
در انتها کدهای update را در فایل shareController.php می نویسیم.
public function update(Request $request, $id)
{
      $request->validate([
        'share_name'=>'required',
        'share_price'=> 'required|integer',
        'share_qty' => 'required|integer'
      ]);

      $share = Share::find($id);
      $share->share_name = $request->get('share_name');
      $share->share_price = $request->get('share_price');
      $share->share_qty = $request->get('share_qty');
      $share->save();

      return redirect('/shares')->with('success', 'Stock has been updated');
}
حال می توانید داده های موجود را بروزرسانی کنید.
9- حذف داده ها
برای اینکار فقط نیاز است کدهای متد delete را در فایل shareController.php قرار دهیم.
public function destroy($id)
{
     $share = Share::find($id);
     $share->delete();

     return redirect('/shares')->with('success', 'Stock has been deleted Successfully');
}
حال می توانید برنامه را اجرا کنید.
کدهای موجود در این آموزش را از اینجا دانلود کنید.


در این قسمت، به پرسشهای تخصصی شما دربارهی محتوای مقاله پاسخ داده نمیشود. سوالات خود را اینجا بپرسید.
در این قسمت، به پرسشهای تخصصی شما دربارهی محتوای مقاله پاسخ داده نمیشود. سوالات خود را اینجا بپرسید.